One reader wrote in with ACTUAL EXPERIENCE, FEEDBACK, INFORMATION, and INSTRUCTIONS on extending WiFi range in an RV park. As an added bonus, this reader was also able to increase security.
(Dan this is you. Let me know if you want more credit with your last name. We didn’t talk about it at length! :-) Sorry it took me so long to publish this. )
I had also spoke at length with this reader and he was a smart cookie so I really liked his inputs and trust a great deal of what he says here. I did take some editing liberties, but tried to retain the spirit and sense of what he wrote me.
— start of Dan’s writeup —
Recently, my wife and I sold our house in Spokane, WA and hit the road in our new RV, with the intention of living and working from the road for an entire year. We work from home, so our computers are important to us, as is the security of our computer network.
We were hesitant to simply connect our computers directly to any RV park’s WIFI for our connection, worrying about the security of our connection. My goal was two-fold; To put a firewall between us and any RV park’s WIFI, and to have the ability to connect to WIFI networks further away than our computers can see.
This article lays out what I did to arrive at what I feel is the best solution for RVers in similar situations. Here’s what I did;
After surveying the selections on the internet carefully, I bought the NanoStation M2 from Ubiquiti Networks, easily found at
Amazon here
. It’s a fantastic and inexpensive product, at around $85.
This WiFi Range Extending device has an interface allowing you to see all the WIFI networks nearby. You can either mount the M2 on the roof of your RV for the best results, or (like I did) simply place it near a window inside your RV. Window mounting should be totally sufficient in most situations.
The M2’s interface lets you connect to any nearby WIFI network. It has a nice interface that lets you enter the WIFI connection’s password, then save it as the default, so you only have to do this once, initially, at each RV park you visit. Then, when you arrive at another RV park, you simply change it to that park’s WIFI.
Configuring the Ubiquiti WiFi Range Extender Nanostation M2
First, you need to configure your M2. Your Ethernet port must be configured on the 192.168.1.x subnet, or you’ll probably struggle to log into the M2, so you should permanently configure your Ethernet port with a static IP on that subnet, because this is how you’ll always need to connect to your M2, now, and later in order to connect it to a different wifi network.
Once you’ve done that, follow the instructions in the M2’s documentation, but in general, it’s as simple as connecting it to your Ethernet port, logging in, and browsing for a network in the SSID location on your Wireless tab, then locking the SSID to the AP. (You’ll see a button for that.) Remember when you’re on the Wireless tab to enable security, so your connection to the park is encrypted!
Configuring your router to work with the Ubiquiti WiFi Range Extender – Nanostation M2
Secondly, make sure your router is not on the 192.168.1.x subnet, as some routers (especially Netgear routers) will automatically change their subnet IP’s to 10.0.0.x (with the router on 10.0.0.1) when the router sees it’s ISP (in this case the M2) is on the same subnet.
This will totally mess you up, so before you begin, just put your router on the 10.0.0.x subnet (with the router on 10.0.0.1). It’ll save you some hair pulling and frustration!
Once you’ve done the above items, here are instructions on how to connect the cabling of the M2 to your router;
Connecting the cabling of the M2 Nanostation Range Extender to your router
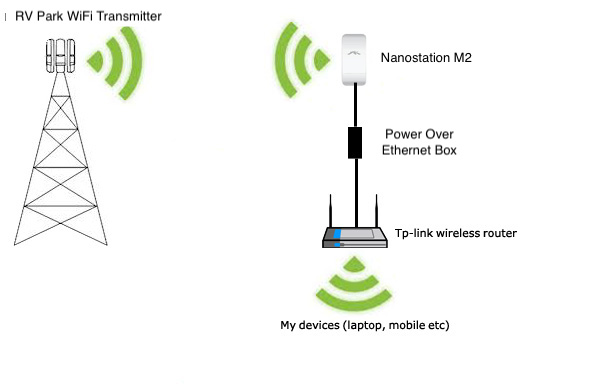
When you receive your M2, you’ll notice it has no power cord, as it’s powered over Ethernet (POE). This just means some of your Ethernet cables will run through a POE dongle that’s included with the M2. Here’s how the cabling connects your router, M2, and the POE dongle:
Cable 1: Connect a cable from the Internet port of your router to the LAN port of the dongle.
Cable 2: Connect a cable from the POE port of the dongle to the Main port on the M2.
Cable 3: Connect a cable from the Secondary port of the M2 to the Ethernet port on your computer. (You’ll only connect this cable when you need to log into the M2, to connect it to a different wifi network.)
A few extra notes;
– Your router should be set to Bridge mode, which is the default mode, so don’t touch that setting.
– The Ubiquiti Networks website (see link below) has excellent support if you use their chat feature.
– The folks at Ubiquiti Networks may tell you that you need a switch between your Router and the M2. That’s not true in this configuration.
– You may be tempted to buy the NanoStation M5 instead of the M2, but I figured it was safer to use the M2 since the M5 has a 5 ghz signal which might not work with my wireless printer. The M2 was the safer route as it’s on the 2.4 ghz signal that works on all devices.
– Don’t buy the Loco M2 as its smaller and won’t do as good a job at picking up WIFi networks further away.
– The folks at Ubiquiti Networks told me that I didn’t technically need to use my router, and that if I wished I could simply connect directly to the M2 with my laptop(s), and that the M2 had an encrypted connection which offered sufficient security, but I figured it was best to have that added layer of protection offered by my router’s firewall (which Ubiquiti Networks said the M2 and M5 do not have). Plus, I like the ability of having a router that I can connect printers to, tweak ports on, etc., so this was the best route for me.
– You may find it useful to install the ‘Ubiquiti Device Discovery Tool’. You shouldn’t need it if you use the above methods, but in case you do; Go to https://www.ubnt.com, click on Support, then on Downloads, then Utilities. Download the ‘Ubiquiti Device Discovery Tool (Java – All platforms)’, unzip it, then just open the executable file to run the tool. (FYI, you need to have the lastest version of Java installed for it to work.)
Good luck and happy RV’ing!
Dan
— end of Dan’s write-up —
Some things that might even help you more. Dan uses a Nighthawk router and he raved about it separately in an email to me. One more thing he didn’t bring out in the article is that by having your router connecting to everything, you can isolate changes to accommodate an RV Park Wifi network separately from the router. Here is a link to the
Nighthawk router on Amazon
.
If you need more help on installing your router technology – you might consider this 24/7 online service to help you with technology.
 24/7 Help